Finally, iPhone will be launched in India by October/November '08.
I was amazed when I heard the price that won't be more than $199 (across 70 countries worldwide), although you wont get it in that amount, you will have to tie up with your service provider. In India, Vodafone is going to launch it with minimum plan of around Rs. 23,000 with 2 year subscription.
As Steve Jobs said in recent WWDC, Price was the major factor for the people who didn't buy the iPhone in the countries where iPhone launched. So Apple slashed the price 50% less!
But.. will we the new iPhone 3G with all the feature & accessories provided with previous version of iPhone (iPhone EDGE), thats the big question.
Lets hope in India, we will get the same as we can see in this video
Lets unpack the iPhone.
What you will need to setup Subversion on windows
- Subversion windows installer
- SVNservice
- SVN Client
Install Subversion
Download the subversion installer for Windows from: http://subversion.tigris.org/servlets/ProjectDocumentList?folderID=91
I installed the version 1.4.6, you can download the same or 1.4.5 or 1.4.4 also.
Run the installer, and install the subversion on your local machine.
To hold your repositories you will need to creatd a folder anywhere in your machine. I created the folder here: 'e:\subversionInstall svnserve as a Windows service
To install svnserve as a service, which allows it to run in the background automatically on start-up, download SVNService from:
SVNService.exe
Just copy SVNService.exe file into 'bin' directory of Subversion's install directory.
I installed subversion in 'C:\Program Files\Subversion'. So I copied 'SVNService.exe' to 'C:\Program Files\Subversion\bin'
Open comman prompt.In order to customize the root directory from which svnserve will serve the repository, I provided the parameters as 'e:\subversion', which was my repositories folder, you can replace it with your repositories folder. Type in command prompt:
svnservice -install -d -r e:\subversion
To start the service with in windows startup, set the service start to 'Auto'
sc config svnservice start= auto
To start the service immediately
net start svnservice
Add an environment variable for SVN_EDITOR. You can do this by right-click on my Computer > Properties. Go to advanced. Hit the Environmental Variables button. Just add another in there called SVN_EDITOR with a value of C:\windows\notepad.exe
Create a project
To create a new project in svn enter the following command. I created 'firstproject' as new project
svn mkdir svn://localhost/firstproject
At this point, Notepad should launch:

Congo! You just created a new project into Subversion!
svn ls svn://localhost/
Checkout your project
To checkout firstproject from svn repository, you will need a svn client like 'Zend Development Environment'
If you already installed the Zend, follow the steps below:
Open Zend.In Menu bar select Tools » Preferences. Select 'Source Control' tab.
Select 'Source Control Tool' as 'Subversion' from the combobox.
Under General Settings select the 'Path to SVN', browse for the location of 'svn.exe', where you installed the SVN.
I browsed for "C:\Program Files\Subversion\bin\svn.exe". Press OK.
To create a new project in Zend,
select Project »New Project. It will open a New Project Wizard.
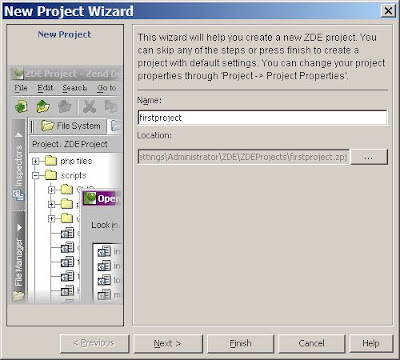
On the first screen enter the name of your project. I entered 'firstproject'. Press 'Next'.
On the second screen, Add path by pressing 'Add Path' button, select the location of directory where you wish checkout the files from 'firstproject' from SVN repository. I select 'C:\firstproject'. Click Next, nothing to do on third screen, click Next. on the fourth screen, click Finish.
From Menu bar, select Tools » Subversion » Checkout
Enter the 'Module URL' as shown in image below & select 'Working directory' (which is the root path of your Zend project 'firstproject'). Press OK.
Congo! you have checked out 'firstproject' from SVN repository.
